

Main board with WiFi and USB interfaces
- Uploads directly to Personal Weather Services via built in WiFi.
- Stand alone operation, no server required, thus no recurring monthly fees.
- 9 additional digital outputs for remote control from anywhere in the world.
- 10 additional digital inputs for monitoring status, 4 alarm triggers to send text or email .
- 3 additional analog voltage inputs to monitor batteries, additional sensors etc.
- Options for soil moisture measurements using VH400 probe.
- High resolution sensors for fast measure and upload interval (2 seconds).
- Java programing back-end for collecting and storing data on PC.
- User programmable web interface for local or remote display.
- No switches or potentiometers to wear out, all solid state sensors.
- Configurable sensor interface allowing use of other wind, sun & rain sensors.
- Consumes less than 1 Watt, can be operated from solar panel and battery alone.
- Supports W-Underground, CWOP/APRS-IP, Weatherbug, PWS and WOW/Metoffice.
- APRS ready, with additional HAM radio and NanoModem directly sends to APRS network.
- Industrial grade wind sensor mechanics made in USA.
See the BLOG for latest news & updates

Baro/Hyg/Temp Sensor

Check out the live station display at my house !
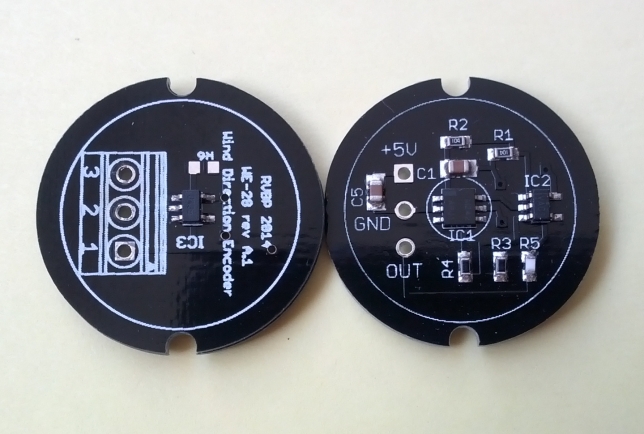
High Res Wind Direction Sensor
 PCB bottom with WiFi module and sensor connectors |
 High resolution wind speed sensor and interrupter wheel |
 High resolution Wind direction sensor |
 High resolution anemometer with optical sensor |

I coded my own program in C using a PIC microcontroller adn used your e-vane and anomometer which worked great! I had to give the hardware back to the school once I got my project finidhed. I never had the chance tofigure out how to upload to CWOP, Iot or some other internet service like maybe even an app I could have made. I would love to find info on how to do this!!
Good Job, I hope you got an A!
If you look in my git under https://github.com/garyStofer/wifi_wx_station/tree/master/Firmware/Wifi_Wunder_Station.X/src you see a file CWOP_Client.c It’s the function that prepares the http string to post for a CWOP host. CWOP ‘s format is slightly different from that of WeatherUnderground, so there is a different function for them. You find the calls to the send functions on the bottom of the OncePerSecondTask in the file Once_perSecond.c
Making an mobile app requires a server somewhere on the internet that holds the data for you . you could use AWS from Amazon for that for example — or if you don’t mind opening a port in your firewall and using port forwarding, you could put your station directly on the internet for an application to pull data off. I have done that on my stations via an XML file that holds all the current readings for an app to collect.
Great system!! Very impressive. Thanks neighbor!
Really enjoyed this article, can you make it so I receive an update sent in an email every time you publish a fresh update?
Hi there,
Glad you liked the article
On the front page on the right hand lower corner there is “follow blog via email” button that lets you sign up for email delivery.
Cheers
Gary
Very nice stuff! Available for purchase yet?
Yes, check out the Order Now page on the upper right.
Nice work! I’m going to follow this one. Seems to contain a lot of information relevant to my own (a bit different) weather station project. You can find more information here: http://weatherhelge.wordpress.com/.
My station is up and working very well. Thanks Gary
Any chance I can buy the wind sensors?
Yes I have sensors available, contact me via email for specifics etc. GaryStofer@gmail.com
Very nice stuff! Available for purchase yet?
At this point I have some BETA units available. I’m still trying to find out how to best manufacture the boards at an attractive price point.
Could this system interface with a Oregon Scientific or Acurite rain gauge? How would that work?
Yes it can! I’m using an Acurite bucket myself. I connected two wires to the reed contact inside the Acurite bucket and brought it out of the housing and to the input of the station. Whenever the tipping mechanism flips it causes the switch to close momentarily which crates a pulse on the wires. The wire goes a couples of feet from the bucket to my weather station post out in the yard. The original wireless signaling to the Acutite LCD display still works as well. The station software has a calibration feature where you can set the number of counts per inch. Usually they are calibrated at 100 counts per inch, but my unit initially was a bit off at around 145 counts per inch.